![]()
The Crucible is a Single Player and Multiplayer level.
This level includes a few gimmicks in Deathmatch such as a cage that results in the player relying on others to either release or kill them. Powerups are dangerous to obtain and put the player in vulnerable positions.
Unlike many other levels at the time, this level highly promotes camping, arguing that a player that is hiding will get less kills and allows for more variety in tactics. While mayhem works, the level designer preferred clever strategy over mindless carnage. Furthermore, he included a decent number of spawn locations to prevent instant Telefragging on spawning.
While this level was originally intended to include Rotfish in the pool of Water, the designer realized that there was a bug which counted the Monster twice and thus removed them to ensure the level could be 100% completed.
The starting room is somewhat based off of a common mansion design in the southern United States during the 1800s.
Quick Level Completion
- Drop to the floor below, then head through the Movable Wall straight ahead.
- Turn right to head to the wall, then turn left to enter the next room.
- Turn left to reach the wall, then turn right to cross the room before turning left.
- Head down the staircase as it veers to the right.
- Go through the Movable Wall, then continue to the middle of the room before turning left.
- Head down the corridor to enter the next room.
- Use either route, to the left or right, to head to the opposite side of the central crucible and acquire the Silver Key.
- Return to the starting room, then head up either ramp, to the left or right.
- Go through the Silver Door and around the pillar.
- Turn right and head to an intersection, then turn left.
- Cross the bridge to drop to the floor below, then turn right.
- Pass the Elevator and turn left at the wall, then cross the large room.
- Turn left, then head to the middle of the bridge.
- Turn left and jump onto the crucible, then proceed forward to reach a four-way intersection.
- Turn left, then head down the ramp to reach an Elevator.
- Ascend the Elevator and turn left, then step onto the platform on the top.
- Turn right and continue to an intersection, then go through the doorway to your right.
- Continue down the corridor before heading up an Elevator to reach the floor above.
- Turn around and head through the Teleporter, then head up the stairs.
- Turn left and walk to the wall, then turn left once more to collect the Gold Key from the balcony.
- Retrace your steps to the intersection on the crucible, then head down the ramp opposite the side leading to the Gold Key.
- Turn right and head up the stairs, then continue to reach an intersection.
- Turn left to reach the wall, then turn left to follow the platform to a doorway.
- Turn right to go through the doorway and enter another room with Bars.
- Open the Bars and drop to the floor below.
- Jump onto the ledge straight ahead, then drop to your left to land on a Button.
- Turn around to cross the Bridge raised by pressing the button.
- Press the Button on the structure straight ahead, then turn right.
- Wait a moment for the Bridge to appear, then cross the bridge to reach the Teleporter and exit the level.
Walkthrough
The Crucible
Turn right to drop off the structure and reach the floor below while collecting a 25 Health. Turn around, then head around the left side of the structure to collect the Nails and Shells. Kill the Rottweiler to your right, below a set of ramps, and the Knight on top of the ramps beside the Silver Door. Proceed to the far wall while collecting the two 25 Health, then turn right to face an alcove. Head into the alcove to collect the Nails, then return to the base of the set of ramps and face the wall with the Silver Door. Open the Movable Wall straight ahead to reveal the next room, then turn right and head down the corridor. To your right is a Shootable Button that looks like a Gold Door sign, ignore this for the time being and instead turn left. Enter the next room while killing the Grunt in the cage straight ahead, then turn left to kill another Grunt. Turn right to look into the room, then start heading down the room while pushing the Button on the left wall, which will temporarily open the Bars at the far end of the room. Ignore the corridor to your left before the Bars and enter the temporarily opened doorway, then turn right and head to the wall. Turn right once more, then proceed forward to collect the Shells and Double-Barrelled Shotgun. Look through the bars straight ahead to shoot the Gold Door sign, lowering the Bars once more and allowing you to exit the cage. After retracing your steps to pass the Bars once more, turn right and follow the staircase as it curves to the right. Kill the Grunt at the bottom, then head through the Movable Wall to reach the next room. Kill the Enforcer straight ahead, then proceed forward to the middle of the room. Turn right to collect the 25 Health from the alcove, then turn around to kill the Enforcer in the doorway. Head to the upper right corner of the room to collect the 100 Health, then head through the doorway to reach the next room. Turn left to kill the Grunt, then turn around to collect the 25 Health. Turn left, then head around the small light to reach the next section of the room. Kill the 2 Rottweilers in this section, then look up to kill the Ogre on the platform above. Look down once more, then head to your right to collect the Green Armor. Continue forward to the far wall to collect the 25 Health, then turn left to kill the Rottweiler. Collect the Silver Key to the right of the pillar and the Nailgun to the left of the pillar, then pass the light on your left while turning left. Kill the Rottweiler in this section, then head to the upper right corner to collect the 25 Health. Turn left to look towards the central structure, then kill the Enforcer on the platform above you. Killing the Enforcer causes 2 Scrags to spawn in the section to your left, head over there and kill them.
Return to the starting room. Picking up the Silver Key spawned a Fiend beside the starting platform, kill it and then head up the ramps to reach the Silver Door. Go through the Silver Door, then head around the pillar to kill the 2 Knights on the staircase. Ignore the passageway to your left and instead turn right, heading down the corridor while ignoring another doorway to your left. Collect the 25 Health, then open the Movable Wall straight ahead to kill the Death Knight. Head into the room, then turn left to collect the Yellow Armor on top of the platform. Return to the corridor outside, then head through the last doorway you ignored. Turn right to kill the Scrag, then turn left to look into the room once more. This room has a pair of bridges with a pool of Water below, drop into the Water and turn right to go through a doorway and down a corridor. Swim along the surface, then use the left staircase while turning left to reach the floor above. Turn left to collect the 25 Health, then turn left once more to look over the pool of Water and kill a Scrag. Turn left, then head down the platform to collect the Shells. Turn right to collect the Nails, then return to the two bridge room. Head to the upper left corner of the room, then turn right and climb onto the doorway opposite the one you used to initially enter the room. Turn left to head down the corridor, exiting the room. The corridor turns left twice before bringing you back to the staircase near the Silver Door. Turn right to follow a ramp, then turn right once more to drop onto a platform above the cage near the start (#1). Retrace your steps to the two bridge room, using the right bridge. Head through the doorway on the far side to drop to the floor below while collecting the Shells and 25 Health. Turn right to kill the Rottweiler that just spawned, then proceed forward to pass an Elevator that allows you to return to the two bridges above. Turn left, then head down the lengthy platform to collect the 2 Nails on the far side. Turn left, you are now on the middle floor of the area with the Ogre. Cross the next bridge, then collect the 2 Shells to your right before turning left. Proceed forward to reach the far wall, then turn left. Much like the other side, cross the Elevator which allows access back to the two bridge room above to collect the two 25 Health.
Return to the middle bridge of the area, between the 2 Nails and 2 Shells. Turn right to jump to the ramp straight ahead, this is the titular crucible, a container with a pool of Lava below. Continue forward, heading up before heading down another bridge, to reach a small platform. Collect the Cells on the platform, then return to the top of the crucible. Drop into the Lava of the crucible to be brought to the room under the Yellow Armor (#2). Retrace your steps to the top of the crucible, then head to the side without the railing to reach an Elevator that ascends to an upper floor. Turn left at the top to step onto the platform, then turn right to reach an intersection. Turn left and head down the platform to collect the Nails, then turn around and head to the opposite side of the platform. Turn left, then go through the doorway and down the corridor. Collect the Nails in the upper left corner of the room, then stand on the Elevator in the middle of the room to ascend to the floor above. Turn around at the top, then go through the Teleporter. Turn around, there is another Teleporter to bring you back to the room you just left. Collect the Nails to your left, then turn around and head up the staircase before turning left at the top. Turn left to head down the next section, then turn left once more to collect the Gold Key on a platform overlooking the starting room. Turn right to kill the 2 Scrags that spawned when you picked up the Gold Key, then retrace your steps to the top of the crucible. Turn right, then head down the ramp to reach a platform with a railing beside it. Turn right, then ascend the staircase before proceeding forward to reach another intersection. Turn right, then proceed forward to collect the Grenade Launcher. Turn around, then cross the platform to collect the Nails before turning left. Head up the ramp to reach the end of the platform, then turn right and go through the doorway to reach the next room. Straight ahead is a set of Bars which require the Gold Key to open, raise the Bars and drop into the hole below.
As you land, you will be pushing a Button on the floor that raises a Section of flooring on the balcony across from you. This serves no purpose, so instead jump onto the small ledge and drop to the room below while turning right. Kill the Spawn straight ahead. Press the Button to your left to kill the Zombie in a cage straight ahead with a Movable Wall that crushes the Zombie. Turn right to kill the Zombie on the platform to your right. Straight ahead are three platforms, two to your right and one to your left, with a pool of Lava and Lavaballs below them. Between you and the Lava is a Teleporter moat, this just drops you in the cage, where you can press a Button on the wall facing away from the Teleporter moat to be released after a momentary delay. A Button underneath the cage performs the same function. Between you and the cage is a Button on the floor, press it to create a temporary Bridge leading to the isolated platform. Turn right and cross the Bridge to reach the platform. To your left is another Button to raise the Bridge from this side. Enter the Teleporter, then kill the Scrag straight ahead. Behind you is a Teleporter leading back to the area you were just at, while to your left is another pool of Lava. Collect the Rockets straight ahead, then turn right and head up the section of stairs. Turn left to head up the next section, then turn right to reach the next section. Turn right once more to reach the platform opposite the Gold Key platform overlooking the starting area. Collect the Rocket Launcher on this balcony, then retrace your steps to return to the area where you killed the Spawn. Ignore the Button on the floor straight ahead for the time being, instead going through the doorway to your right while turning right. Turn left to head up the staircase while killing the Zombie, then turn left to head up the next section. Surrounding the staircase is another Teleporter moat that leads to the cage, ignore this and instead turn left. Kill the Zombie while proceeding forward to reach the balcony across from the entrance to this room. Collect the Nails and Super Nailgun in the alcove to your left. Note that this alcove has an invisible Wind Tunnel, jumping will push you right into the Teleporter moat and therefore the cage. Retrace your steps to press the Button you previously ignored, this will cause a Bridge to temporarily be raised beside you to reach the platform where you killed the Zombie earlier. Head to this platform, then press the Button on the structure straight ahead. Turn right to face a Teleporter, after a moment a Bridge will extend to allow you to cross to the platform with the Teleporter, head to this platform and then enter the Teleporter to exit the level.
Differences from Easy to Normal
- No Shells or Nails by the starting platform.
- 2 Rottweilers in starting room, 1 in each alcove beside the ramp structure.
- 2 Grunts added inside Double-Barrelled Shotgun cage.
- No 100 Health in five alcove room.
- 2nd Rottweiler added to bottom floor of crucible room, opposite side from Green Armor side.
- Ogre on Grenade Launcher platform in crucible room.
- 3rd Scrag spawns when Enforcer on crucible platform is killed.
- 3rd Knight on staircase by Silver Door.
- Enforcer instead of Rottweiler spawns in room with Elevator to two bridges, side closer to hidden alcove.
- Vore by Thunderbolt in (#2).
- Ogre in small Teleporter room at top of Elevator leading to Gold Key balcony.
- 3rd Scrag spawns when Gold Key is taken.
- Shambler spawns on Spawn platform when Super Nailgun is taken.
Differences from Normal to Hard/Nightmare
- 2 Enforcers, 1 in each alcove to the side of the entrance Movable Wall, in five alcove room.
- 3rd Rottweiler added to bottom floor of crucible room, Green Armor side.
- 4th Scrag spawns when Enforcer on crucible platform is killed.
- 4th Knight on staircase by Silver Door.
- Ogre instead of Enforcer spawns in room with Elevator to two bridges, side closer to hidden alcove.
- Scrag in room with Elevator to two bridges, side further from hidden alcove.
- 4th Scrag spawns when Gold Key is taken.
- Ogre beside Bars requiring Gold Key.
- Scrag on staircase leading to Super Nailgun in final section.
Secrets
| Secrets | ||
|---|---|---|
| (#1) |  |
From the staircase near the Silver Door, follow the left corridor to reach an intersection. Heading forward will bring you down a ramp, turn right to drop to a platform above the cage room that is too steep to be accessed from that side. Collect the Quad Damage on this platform. |
| (#2) | 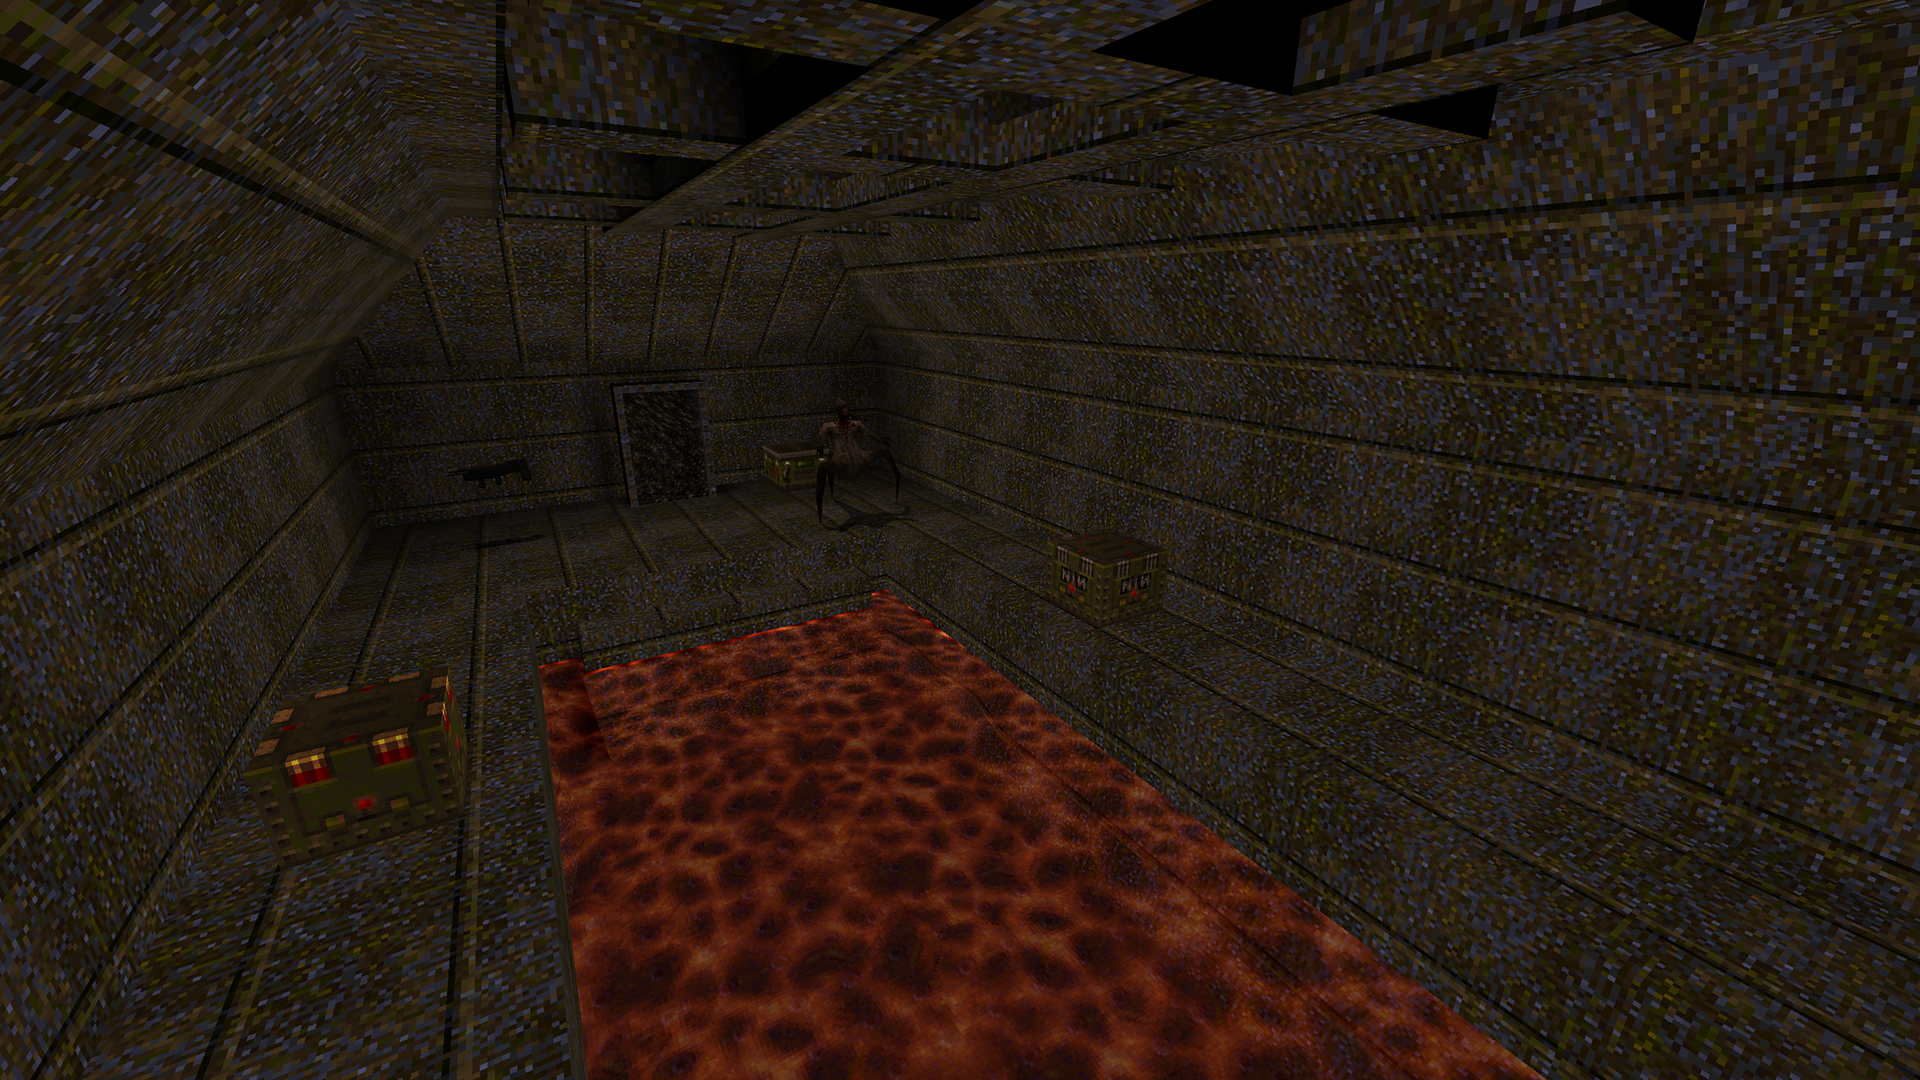 |
Drop into the Lava of the crucible near the top to collect a Pentagram of Protection. Facing the wall below the Cell platform, head to the middle to push a Button, which will Teleport you to a pool of Lava in the room seen through the flooring of the Yellow Armor room. Proceed forward to climb a staircase and leave the Lava. Collect the Thunderbolt in the upper left corner and Cells in the upper right corner, then turn around. Follow the left side to collect the Nails, then continue to the end to collect the Quad Damage. Turn right, then proceed forward to collect the 15 Health and Red Armor. Turn right to follow the next section and collect the Shells. Head to your right to return to the top of the staircase, then proceed forward to go through the Teleporter, bringing you back to the top of the crucible. |
Enemies
| Type | Count | ||
|---|---|---|---|
| Easy | Normal | Hard/Nightmare | |
| Rottweiler | 6 | 8 | 9 |
| Grunt | 4 | 6 | 6 |
| Zombie | 4 | 4 | 4 |
| Knight | 3 | 4 | 5 |
| Enforcer | 3 | 4 | 5 |
| Scrag | 7 | 9 | 13 |
| Spawn | 1 | 1 | 1 |
| Ogre | 1 | 3 | 5 |
| Death Knight | 1 | 1 | 1 |
| Fiend | 1 | 1 | 1 |
| Vore | 0 | 1 | 1 |
| Shambler | 0 | 1 | 1 |
| Total | 31 | 43 | 52 |
Deathmatch

The Crucible (Deathmatch)
Differences
- Rockets beside structure in open courtyard.
- Small grooves are found on the Rocket Launcher balcony, allowing access to it from the open courtyard.
- No 100 Health in five alcove room.
- Silver Key replaced with Nails.
- Silver Door replaced with Movable Wall.
- Grenade Launcher in hidden alcove.
- Super Nailgun and Nails on rafter overlooking crucible room.
- Rockets on Cell platform.
- Grenade Launcher and Rockets in small Teleporter room at top of Elevator leading to Gold Key balcony.
- Gold Key replaced with Super Nailgun.
- Rockets on Grenade Launcher balcony in crucible room.
- Bars do not require Gold Key.
- Nails in room with Bars that used to require Gold Key.
- Button in cage of Teleporter trap causes the player to be crushed by a Movable Wall instead of unlocking the cage.
- Contents of Wind Tunnel alcove replaced with Yellow Armor, Ring of Shadows, and 100 Health.
Spawn Locations
- Alcove of five alcove room, 25 Health side, Movable Wall side.
- Alcove of five alcove room, opposite 25 Health side, Movable Wall side.
- Alcove of five alcove room, opposite 25 Health side, opposite Movable Wall side.
- Alcove of five alcove room, 25 Health side, opposite Movable Wall side.
- Yellow Armor room.
- Rafter overlooking crucible room.
- Hole below Bars leading to Teleporter trap.
- Outer courtyard.
| Custom Levels | Introduction |